GPU passthrough in Fedora with plain QEMU
Latest update:
| QEMU | 6.1.0 |
| Host OS | Fedora 35 |
| Guest OS | Windows 10 21H1 |
| CPU | AMD Ryzen 5 PRO 4650G (Zen 2, Renoir) |
| Host GPU | Radeon Vega 7 |
| Guest GPU | Radeon HD 8570 (R7 240, Oland) |
Prerequisites
# dnf install qemu qemu-img libvirt-daemon
Enable virtualisation in your bios. For AMD, the option is usually
called SVM. If a motherboard has a separate IOMMU option, leave it in
auto state.
Check:
$ virt-host-validate | grep hardware | tr -s \\040
 QEMU: Checking for hardware virtualization : PASS
(You may uninstall libvirt-daemon package, for we are using plain
QEMU without libvirt.)
A guest GPU ROM must support UEFI. R7 240 in the table above is
perhaps the cheapest valid GPU (for a passthrough) that money can buy,
but which is still miles ahead of emulated graphic cards in QEMU or
VMWare.
Connect an hdmi/dp cable from your 2nd GPU to a
2nd monitor (I actually use 1 monitor with 2 inputs).
Connect a spare USB keyboard & a mouse, i.e. your machine must have 2
physical keyboard+mouse pairs. After you successfully install a
guest OS, software like Barrier makes the 2nd pair
unnecessary (unless you play games).
IOMMU Groups
IOMMU is a feature that allows us to passthrough PCI devices. In
Fedora it's off by default. Simultaneously with turning it on, we are
going to unhook our 2nd GPU from it's current driver & hook
it to a driver called vfio-pci.
PCI devices are mapped into IOMMU groups. You can passthrough a group
of devices as a unit. That means if your main GPU is in the same group
as a secondary one, you're screwed.
This (unfortunately long) script prints all IOMMU groups:
$ cat iommu-groups
#!/bin/sh
# shellcheck disable=2012

[ -z "$1" ] || {
    $0 | awk 'BEGIN { RS = "" } /'"$1"'/ {print; m++} END { exit (m == 0) }'
    exit $?
}

device_info() {
    lspci -s "$1" -nnk | sed -E 's/^[0-9].+/printf "*  %s" "\0" | fmt -t/e'
}

ls -d /sys/kernel/iommu_groups/* | sort -V | while read -r grp; do
    echo "${grp##*/}"
    for dev in "$grp/devices/"*; do device_info "${dev##*/}"; done
    echo ''
done
Check a particular group & what drivers it uses:
$ ./iommu-groups Oland
8
*  10:00.0 VGA compatible controller [0300]: Advanced Micro Devices,
   Inc. [AMD/ATI] Oland [Radeon HD 8570 / R5 430 OEM / R7 240/340 /
   Radeon 520 OEM] [1002:6611]
        Subsystem: Dell Radeon R5 240 OEM [1028:210b]
        Kernel driver in use: amdgpu
        Kernel modules: radeon, amdgpu
*  10:00.1 Audio device [0403]: Advanced Micro Devices, Inc. [AMD/ATI]
   Oland/Hainan/Cape Verde/Pitcairn HDMI Audio [Radeon HD 7000 Series]
   [1002:aab0]
        Subsystem: Dell Device [1028:aab0]
        Kernel driver in use: snd_hda_intel
        Kernel modules: snd_hda_intel
Group #8 contains only 2 devices: a 2nd GPU & its audio
interface.
To turn IOMMU support on & hook the devices we're interested in to
vfio-pci, we need to modify kernel parameters & rebuild initramfs.
$ grep CMDLINE /etc/default/grub | fmt -t
GRUB_CMDLINE_LINUX="resume=/dev/sdb6 iommu=1 amd_iommu=on
   rd.driver.pre=vfio_pci vfio-pci.ids=1002:6611,1002:aab0"
Parameter vfio-pci.ids=1002:6611,1002:aab0 binds an array of devices
to a vfio driver that prevents the host OS from interacting with them.
1002:6611, for example, is a PCI vendor:device pair from the
snipped above.
To commit changes, type
# dracut -fv
# grub2-mkconfig -o /boot/grub2/grub.cfg
& reboot.
$ ./iommu-groups Oland | grep 'Kernel driver'
        Kernel driver in use: vfio-pci
        Kernel driver in use: vfio-pci
QEMU calls
This is the most annoying part. If you do it 'incorrectly', you may
end up with a purportedly successfully installed guest OS, but then
Windows updates GPU drivers and--boom!--the monitor goes black.
This (unfortunately big) makefile will get you started:
$ cat Makefile
iso := Win10_21H1_English_x64.iso
gpu := 10:00.0
audio := 10:00.1
usb_kbd := 24ae 1001
mem := 3G
cpu_cores := 2
hda := c.qcow2
hda.size := 64G

$(if $(SUDO_USER),,$(error Run this under sudo))
uefi_firmware := /usr/share/edk2/ovmf/OVMF_CODE.fd

all: uefi-vars.fd $(hda)
    modprobe kvm_amd
    qemu-system-x86_64 \
     -enable-kvm \
     -machine q35,accel=kvm,kernel_irqchip=on \
     -cpu host,kvm=off,hv-vendor-id=1234567890ab \
     -smp cores=$(cpu_cores) \
     -m $(mem) \
     -cdrom $(iso) \
     -boot order=d \
     \
     -drive if=pflash,format=raw,readonly=on,file=$(uefi_firmware) \
     -drive if=pflash,format=raw,file=$< \
     \
     -usb \
     -device usb-host,vendorid=0x$(word 1, $(usb_kbd)),productid=0x$(word 2, $(usb_kbd)) \
     \
     -device ioh3420,id=hub1,chassis=0,slot=0,bus=pcie.0 \
     -device vfio-pci,bus=hub1,addr=00.0,host=$(gpu),multifunction=on \
     -device vfio-pci,bus=hub1,addr=00.1,host=$(audio) \
     -vga none \
     \
     $(if $(offline),-nic none,-device e1000,netdev=n0 -netdev bridge,id=n0) \
     \
     $(hda)

uefi-vars.fd: /usr/share/edk2/ovmf/OVMF_VARS.fd
    cp $< $@

$(hda):
    qemu-img create -f qcow2 $@ $(hda.size)
Variables of interest:
gpu := 10:00.0
audio := 10:00.1
usb_kbd := 24ae 1001
gpu & audio are bus numbers you can obtain from iommu-groups
script. usb_kbd here contains IDs (vendor product) for a wireless
keyboard (that also includes a touchpad); you can look them up with
lsusb command.
The makefile creates an empty disk drive, copies required files for a
UEFI instance & runs qemu.
The holy grail is
-device ioh3420,id=hub1,chassis=0,slot=0,bus=pcie.0 \
-device vfio-pci,bus=hub1,addr=00.0,host=$(gpu),multifunction=on \
-device vfio-pci,bus=hub1,addr=00.1,host=$(audio) \
-vga none \
Without ioh3420 'north bridge' device I had the aforementioned issue
with a black screen after Windows had had auto-updated AMD drivers.
When you run the makefile for the first time, qemu may try to boot
from the network & if that takes too long to fail, rerun the command
as
$ sudo make offline=1
It may also drop you into a UEFI interactive shell. Type exit there:
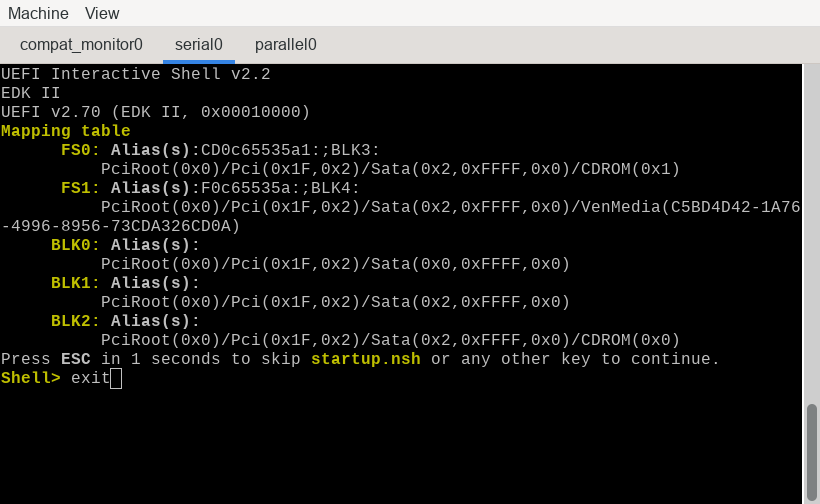
Next, choose Boot Manager menu item:

Finally, select 'DVD-ROM' option, press Return, then quickly press
Return on your 2nd keyboard (connected to the VM) as
well, & your 2nd monitor should display Windows
installation screen.
Tags: ойті
Authors: ag